This the second part of our series about some important considerations for Gibson and Fender pole piece spacing. Part One talked about things to consider for humbuckers. This section will cover things you’ll want to know when setting up instruments with single coil pickups.
First, to review – the main focus of this series is to understand that there is a slight difference in the pole piece spacing between typical Gibson style pickups and Fender style pickups. By “pole piece spacing” we mean the amount of space in between the pole pieces of the pickups. This roughly relates to the spacing in between the strings of the guitar, but not entirely. More on this point later.
NOTE: This is Part One of a two-part blog post. Go To Part Two.
We get enough questions about Gibson pole spacing versus Fender pole spacing that it’s worthwhile writing about here in the Lollar blog.
The best way to proceed is to review the most common questions.
But first, we’ll start with some basics…..like, what do you mean by Gibson spacing and Fender spacing?
That terminology is actually referring to the physical spacing between the pole pieces. This roughly corresponds to the distance between the strings themselves, but not entirely. (More on that point later). In general terms, the spacing between pole pieces is slightly wider on Fender style pickups, and slightly narrower on Gibson style pickups. The overall difference – when you measure from the centers of the 2 outside pole pieces – is roughly 2 to 3 millimeters. In other words, if you measure from the center of the high E pole piece to the center of the Low E pole piece, a Gibson spaced pickup will measure right around 50 millimeters. A pickup with Fender spacing will measure between 52 and 53 millimeters, depending on the pickup.
This is a follow-up to our previous Blog entitled, “How Important is Guitar Pickup DC Resistance?”
We decided to further demonstrate an important property of guitar pickup DC resistance. That is, how temperature can affect the DC resistance reading on the SAME pickup.
So we did a simple experiment for you. This will help demonstrate the point.
We took the SAME pickup, a 2009 Lollar Vintage T Series bridge, and placed it in three different temerature settings and photographed the results. As you will see, the same pickup will have different Ohm meter readings when the pickup’s temperature changes.
Here goes:
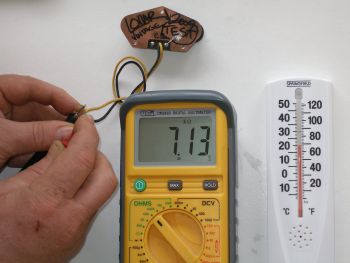
Setting Number 1 – Room Temperature
This particular Lollar Vintage T Series bridge reads a little over 7.1K at 68 degrees fahrenheit.
Here you will find our stock Lollar Vintage T Series bridge (one of our most popular, by the way). The DC resistance is taken at room temperature, as indicated by the thermometer.
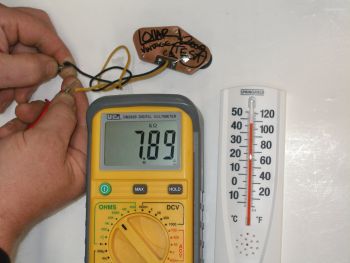
Setting Number 2 – Warm
This same Lollar Vintage T Series bridge has a reading of almost 7.9K after it has been warmed up for about an hour.
This next photo shows a higher DC resistance reading, taken on the very same Lollar T Series bridge pickup. We let this pickup sit at the warming station for about an hour. (We warm all of the pickups at the warming station before they are immersed in the molten wax at the potting station.)
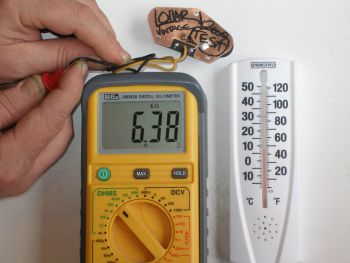
Setting Number 3 – Cold
Now this same Lollar Vintage T Series bridge has a reading of just under 6.4K – it has been sitting in the refrigerator.
This final photo shows how a colder temperature affects the DC resistance. We let the same Lollar Vintage T Series bridge pickup sit in the refrigerator for about an hour. You can see how lowering the temperature of the pickup also lowers the DC resistance reading.
There is quite a bit of misunderstanding about the use of DC resistance as a measurement of a guitar pickup’s output. DC resistance (kΩ) is a handy but rough measure of a pickup’s output. It is most useful for making general comparisons, but not taken much beyond that.
We say this because there are a number of variables that can affect DC resistance. In fact, two of these factors can actually change the DC resistance reading on the SAME guitar pickup.
Temperature, specifically, will do this. The very same pickup will have a higher DC resistance reading when the pickup is warmer, and a lower DC resistance reading when the pickup is cooler. For example, if the pickup has been sitting in a sunny window, the dc resistance will read higher. If you took that same pickup and stored it in your basement / practice room and it was cooler in temp, the DC resistance would read lower.
The dc resistance will also read lower once the pickup has been installed into your guitar.
Another factor is variation of copper wire. Although it’s manufactured to rigorous specs, variation exists between spools of copper wire—including spools made by the same manufacturer and from the same lot number. A microscopic size variance that’s still within specs can affect DC resistance.
Equipment calibration can vary between ohm meters and can also change if your battery is low.
We get phone calls from customers who have questions about the DC resistance their new guitar pickup is showing – at that moment – and the DC resistance values that we publish on our web site. They want to know if there is something “wrong” with the new pickup.
We tell them that unless they are taking that reading at exactly the same temperature as we did here in the shop, their pickup will read slightly differently. More often than not, they will have just received the pickup, pulled it out of the box, and tested it moments after it has just been sitting in either a very cold or a very hot delivery truck.
Another thing to keep in mind is that the DC resistance values we publish are midpoints. The testing was done on average size production runs. Each of the pickups in those runs had a different reading. The values we publish are the midpoints of those groups of readings.
Here is a question we received from a customer. It is a good one, so here you go….
The customer wrote…
“I read the following excerpt from your tech info page:
Inductance (H): When iron or an iron-based (ferrous) metal moves within a magnetic field, it has the capacity to induce a current in any conductive material also in that magnetic field (i.e. the copper wire coil). This is inductance—a measure of the physical property to induce a current. In general, the greater the inductance, the greater the output and greater the bass response.
From the above I would assume my bridge pickup is bassier than the neck because it is higher inductance. But the opposite is true on my guitar. The neck is bassier and the bridge cuts. I love my set up, I am trying to develop a greater understanding [of inductance].
Best, Mr. X”
The statement about inductance is true if everything else is equal. If you put your bridge pickup in the neck position it would sound bassier than the neck pickup in the neck position. If you put the neck pickup in the bridge position it would have less bass than the bridge pickup in the bridge position. This would be the answer, based solely on the property of inductance as described above.
However, there are two related parts of the answer as to why the neck and bridge pickups sound different from each other.
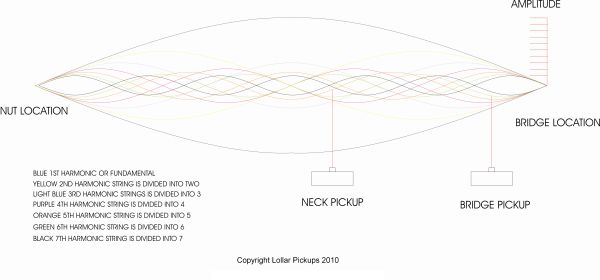
Take a look at this diagram which represents string vibration:
The neck pickup sits closest to the center of the wave pattern
The first part of the answer has to do with where the pickup is located, relative to the string vibration.
The amplitude of the fundamental is greatest at the center point between the nut and bridge. The greater the amplitude of the string vibration, the more the magnetic field of the pickup is disturbed which generates a higher voltage in the coil. More voltage = more output or volume.
The neck pickup sits closest to the full arch of the wave pattern, but the bridge is positioned where it senses only a small fraction of the arch. In other words, if you pick the string near the end of the fingerboard you’ll get a smooth bassy sound. That is what the neck pickup is sensing. If you pick the strings about 1/4″ in front of the bridge, you’ll get a bright thin sound. That is what your bridge is sensing.
The second part of the answer has to do with “how much” of any one frequency the pickup is sensing. Have another look at the diagram above.
The portion of the diagram showing the string vibrating like one big arc represents the fundamental. Your neck pickup sits close to the center of that arc, so you get more fundamental which is the fullest bassiest tone (the fundamental is the note you are actually playing). Strings vibrate in many patterns at the same time, so not only is the fundamental present but many higher overtones are also being generated at the same time.
Now if you look at the area of the diagram that is closer to the bridge, you’ll notice there are many shorter wavelengths clustered together. You’ll also see that it senses a larger proportion of the higher frequency multiples of the note you are playing. Mostly the 4th 5th, 6th and 7th harmonics. In other words, all of the patterns are happening at the same time, but the fundamental and the 2nd and 3rd harmonics are less predominant.