General Pickup Installation Instructions
Installing your own pickups is rewarding, cost-effective, and less challenging than many players expect. Though it might seem intimidating if you haven’t tried it before, with a little patience and a few simple tools you can install and adjust your new pickups at home.
Individual installation instructions will vary with different pickup types and wiring configurations. While we won’t get into all the nuts and bolts below, we’ve provided some information that will be helpful if you plan on installing your own pickups.
We are frequently asked to provide variations or alternate wiring diagrams, such as series/parallel, in/out of phase, coil splitting, et cetera. We generally refer customers to Guitar Electronics as they have a wide variety of both common and not-so-common diagrams available free of charge, as well as custom designs at a reasonable price. We at Lollar are unable to offer custom wiring diagram services.
It is very important to use the supplied installation hardware! This is packed beneath the foam in the original retail packaging. If you do not have the hardware, contact us and we can provide you with the correct specifications so that you can source the parts locally. If you cannot find them locally, we can furnish a replacement screw pack for a small charge.
What You Will Need
- Soldering iron and stand
- Solder
- Brass or kitchen sponge for cleaning soldering iron tip
- Screwdrivers (Phillips for mounting screws and adjustments; flat for certain adjustable pole pieces)
- Long-nose pliers
You’ll want to work in a clean space with good light and ventilation. Solder produces fumes that are toxic; it’s best to open a window and use a fan or carbon fume extractor. A soft, padded work surface (like a yoga mat) will help keep your instrument from slipping and protect the finish.
Basic Soldering Tips
- Use the right tip. Conical iron tips work well for soldering small components in small places, like many on an electric guitar. Chisel tips work well for larger surfaces, or when joining two wires together.
- Tin the tip. Before you start, melt and flow a small amount of solder around the tip of the iron. This is called "tinning" and you should do this on a clean tip before each use session. This helps the iron transfer heat evenly and will protect the tip from wear so that it lasts longer.
- Hold still. This is where a hobby kit “third hand” can be very useful. Keeping components stable while soldering creates the strongest joint.
- Heat the part, not the solder. Bring your iron to the lug, leg, or wire surface that you intend to solder. Heat that part, then bring the solder to it and let the solder flow. This typically takes about 3-4 second on most surfaces with a properly heated iron.
- Go easy on the solder. You don’t need very much for a good joint. You’re looking for a clear, shiny silver joint rather than a dull, cloudy, or brownish one.
- Be careful and aware. Soldering irons can easily be 800 degrees Fahrenheit. Treat an iron with respect like you would anything else with the potential to burn you or start a fire.
BEFORE YOU BEGIN
There are a few things to be aware of prior to installation that will make the process go smoothly:
- Coil wind direction and magnetic polarity
- Type of wire lead (single-conductor versus four-conductor as well as cloth covered versus braided shield)
- Pickup height adjustment
- Type of mount (ring mount, body mount, or pickguard mount)
- How to avoid damage or voiding your warranty while installing
Coil Wind Direction and Polarity
Magnets have a North end and a South end. Magnetic polarity of pickups refers to which end is facing up toward the strings, generally speaking. The coil wind direction refers to the clockwise or counter-clockwise direction of the coil wire around the bobbin, the “centerpiece” or skeleton of the pickup.
In two pickup single-coil sets such as those for Telecaster or Jazzmaster, our default build is for the bridge pickup to be RWRP (Reverse Wound, Reverse Polarity) relative to the neck pickup. In three-pickup single coil sets (P-90s or Stratocaster sets for example) our default is for the middle position to be RWRP relative to the neck and bridge so that they will be hum cancelling when running either neck/middle or bridge/middle pickup combinations.
Building pickups RWRP relative to one another is important in order for pickups to operate in correct phase and to eliminate hum when two pickups are used simultaneously. It is also important to remember that the term RWRP is only meaningful in relation to another pickup. A single pickup cannot intrinsically be RWRP unless referring to another pickup – bridge pickups in our two-pickup sets are the reverse polarity and coil direction relative to the neck pickup.
Opposite magnetic polarity between two pickups ensures correct phase; opposite coil wind direction between two pickups ensures hum cancellation when run together. If they are out of phase, you will experience cancellation of certain frequencies and a decrease in output, a sound most players find unpleasant.
Type of Wire Leads
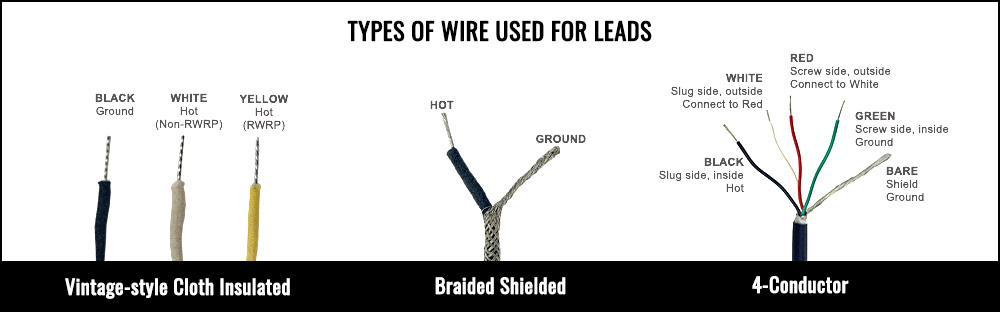
The two most common types of wire we use are for leads are: 1) vintage-style cloth insulated wire and 2) braided shielded cable.
Cloth insulated wire: Commonly found on Fender-style pickups (Stratocaster, Telecaster, Jazzmaster, Jaguar, et cetera). The center conductor is exposed by pushing back the outer cloth insulation; there is no need to strip the wire.
Single-coil pickups typically have two leads, either white/black or yellow/black (for RWRP pickups). The white lead is hot and black lead is ground; yellow lead is hot and indicates a RWRP pickup.
Braided shielded cable: Commonly found on P-90s and single-conductor Gibson-style humbucking pickups and P-90s. In this type of lead, the exterior shield functions as the ground. To prepare for installation, simply unbraid the outside shield by picking at the braid a few strands at a time starting at the cut end and working in a straight line down one side of the cable. Expose 1/2"–3/4" of the inside center lead insulation then twist the peeled back braid into one lead (you can see this result in the image below). This lead created from the braid is connected to ground. The insulated center conductor is the hot lead.
You can also simply push back the braid just like using push back wire. You can then solder the braid directly to ground without worrying about burning through the cloth insulation of the center conductor.
Single- vs 4-conductor leads: In addition to the wire type, there is also the number of conductors to consider. Most common guitar wiring configurations use single-conductor leads. You’ll find this type in traditional Fender designs like Telecasters, Stratocasters, and Jazzmasters. You’ll also find it in typical Gibson wiring configurations like those seen on standard Les Pauls, SGs, and ES-330/335s.
4-conductor leads are used in more complex wiring and switching configurations that involve humbucking pickups. With 4-conductor leads, each of the humbucker’s two coils has two leads. 4-conductor humbucker leads will allow you to use series/parallel, in/out of phase, or coil split switching. To use series/parallel or in/out of phase switching with single-coil pickups such as those for Strat or Tele, you can order your pickup with an additional third wire. With certain other pickups such as P-90s, we can build the pickup with a jacketed 2-conductor lead for using series/parallel or in/out of phase options. If you have questions about what pickup types can be used in this way, please contact us and we’ll help you out.
Pickup Height—Setup and Adjustment
We are frequently asked about the proper height for our various pickup. While there are some general guidelines for a starting point, pickup adjustment is subjective based on the player’s ears, playing style, and individual taste. If it sounds good to you and works with your playing style, it’s correct!
Our recommended starting point for Fender-style pickups or pickups with non-adjustable pole pieces is approximately 1/8" below the strings with the strings fretted at the highest fret on the fingerboard. This applies to bass pickups as well though, because of the wider range of movement of thicker and longer strings, you may end up with a greater difference between the pickup height on your low strings versus the high ones. And if your playing style is aggressive (slap or a heavy pick attack), you may want to set them a little lower so that you’re not making string contact with the pole pieces. Gibson-style pickups or pickups with adjustable poles work best as close to the strings as possible without the strings being disturbed by the pickup’s magnetic pull.
The above instructions are just a guideline for a place to start with your adjustment. Raising or lowering either type of pickup can have a dramatic effect on tone and volume. Remember, follow your ears! For more information, check out our video on pickup height adjustment.
Type of Mount
There are many ways that our pickups can be mounted, even between the same type of pickup at times. Being aware of which type of mount you need will help ensure that your installation goes smoothly. Common mounts are body mount, ring mount, and pickguard mount.
Body mount pickups mount directly to the guitar body with wood screws as in the case with a Telecaster neck pickup or Soapbar P-90.
Ring mount pickups are suspended from a ring surround (often plastic) that is screwed to the body, as with Gibson-style humbuckers and mini-humbuckers, or Firebird pickups.
Pickguard mount pickups mount directly to the instrument’s pickguard, as with Stratocaster pickups.
Again, there are some types of pickups (P-90s, for instance) where you can select one of several different mounting options for your instrument. As always, if you have any doubts or questions, please reach out to our Customer Service team and we’ll help you make the right choice. We can be reached at (206) 463-9838 from 9AM–5PM Pacific Time, Monday through Friday.
Avoiding Damage and the Lollar Warranty
If you are unsure about your pickup choice, we recommend that you do not trim the pickup leads until you’ve made up your mind to keep them. That way, if you decide to exchange the pickups for another type, you won’t be charged a repair fee to install full-length leads once returned. We also recommend using care with chrome or other metal plated parts during install, as we often need to re-cover scratched or otherwise tarnished covers on returned pickups at a repair charge. Please see our Exchange and Return policy.
Warranty: All new Lollar pickups are guaranteed to be free from manufacturing defects for the life of the product to the original purchaser. That being said, there are some things that players might do during installation that can void warranty coverage, such as disconnecting the leads at the pickup, breaking the solder joint that secures humbucker covers, or removing the coil tape.
All pickups are thoroughly tested several times during manufacturing. We back up any work we do and want a chance to fix a problem if one occurs. If you believe you have a potential warranty issue, please contact Customer Service for a return merchandise authorization (RMA) number and our team will evaluate the pickup for service and coverage.
Installing a Charlie Christian for Solidbody Neck Pickup
![]() Pickguard Mount Routing Diagram
Pickguard Mount Routing Diagram
Installing a Charlie Christian for Archtop Pickup
Installing a Blade Style Tele Bridge Pickup